I preach this lesson all the time around here, I know, but you can seriously learn so much about Excel simply by examining templates and other professional's spreadsheets. The 2015 March Madness brackets are no exception. This downloadable template for the 2015 NCAA basketball tournament is an outstanding example of how to harness the full power of Excel and it doesn't involve finances, inventory, tracking, engineering, or charts.
B. David Tyler’s NCAA Excel brackets are the best I've seen, and I've been using his brackets since at least 2010. David doesn't lock or hide anything behind password protection so you can examine all the formulas to see how they work and make any modifications you desire. There are two files: the bracket manager and the individual bracket file. First, download the files here:
http://www.whistleblows.com/2015/03/ncaa-2015-excel-bracket-and-pool.html
Now, open the files and start picking them apart! Listed below are 11 Excel lessons that can be learned from digging into these two templates:
3. Protection - When other users are going to be using your spreadsheet you may want to use protection to protect key cells. Fortunately, David did not use a password on the protection, so you can unprotect the sheets to see what all the exact formulas are.
5. Organization - The 2015 NCAA bracket shows you how to structure a spreadsheet that is potentially going to be used by thousands of strangers - everything is clearly labeled, instructions are included, and there’s information about where to go if you need help.
8. Macro: HTML Export File - One of the macros included in the pool manager file shows you how you can export an Excel sheet to a HTML file (called exportLeaderBoard). Open the Excel document and press Alt-F11. This will open up the Visual Basic editor, and by clicking on sheet and module names on the left side of the screen you will be able to view all the code.
1. Formatting - The bracket sheets are nice and clean and easy to use. Why is that? Because there isn't a lot of flare or unnecessary stuff to distract you. Only a few colors are used, grid lines are turned off, all the font sizes and colors make sense, etc. Less is more.
2. Hidden sheets - When you first open the NCAA bracket you only see two sheets: instructions and the bracket. But if you right click on one of the sheet tabs and click unhide you’ll see there are some hidden sheets, and it’s these sheets that do a lot of the heavy lifting. The beauty of the brackets is the fact you don't have to modify a single formula yourself, everything has been done for you.
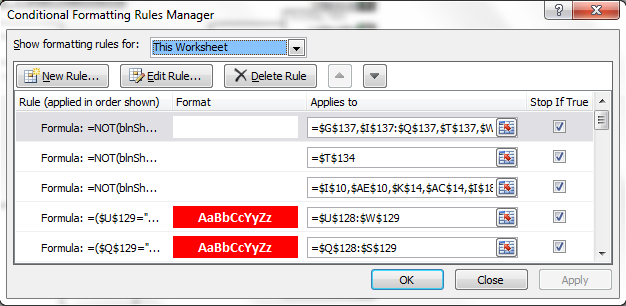
4. Conditional Formatting - Conditional formatting is where you set up rules to change the format of a cell based on a condition. When you get a pick in the bracket incorrect you’ll notice the font turns red with a strikethrough. This is done through conditional formatting. To see how it works, go to the Home tab, click on Conditional Formatting, then Manage Rules. Show formatting rules for: Sheet: Bracket then scroll down and see all the rules.
6. Drop Down Lists - After you make a few selections, you may get second thoughts and decide to go back and change your picks. To do so, you’ll change the winning team by picking from a drop down list. To see how the drop down list works, go to the Data tab, then Data Validation.You’ll see the setting is List and uses a Defined Name. Go to Formulas tab then Name manager to see all the defined names.
7. Error Checking - Are there little green triangles on the cells that are annoying you? To remove them, go to File>Options>Formulas>Error Checking and uncheck the “Enable background error checking” box. There is also a macro in the bracket file used to check for common errors.
9. Macro: Import Multiple Excel sheets - One of the best features of the bracket manager file is the ability to automatically import multiple brackets into the manager all at once. This is done via an Excel macro. All the work is done for the user, as the manager of the pool I simply have to place brackets into a folder then press a button. The user’s of your spreadsheets will really appreciate it if you make everything easy for them.
10. Macro: Hyperlinks - Another nifty feature of the basketball brackets is the ability to simply click on a team to advance them. This is accomplished with a very cool hyperlink macro. The code is run every time a hyperlink is clicked and it checks to see if a game cell is selected, and if so, it advances the team that was selected.
11. Spreadsheets can be fun! - For many, the mention of Microsoft Excel brings up nightmares of pie charts, pivot tables, and data entry. But using Excel can be fun, especially when you’re competing in an office pool. I really like the feature in the manager file that let’s you run scenarios: what if this team wins, and this teams loses, what are my chances of winning?
I know some readers of this blog skip over the templates I post, especially if they're sports related. but there really are many lessons that can be learned by examining them that you can apply to your own spreadsheets to improve them. Special thanks to David Tyler for continuing to update and post his excellent brackets each and every March. What new lessons about Excel have you learned by breaking down a template?


